Interfaces
Interfaces are meant to expose functionality and data from a context, to let users or information systems interact with the system by creating, reading, updating, and deleting data.
Note: The interface definition must be outside a pattern
Example
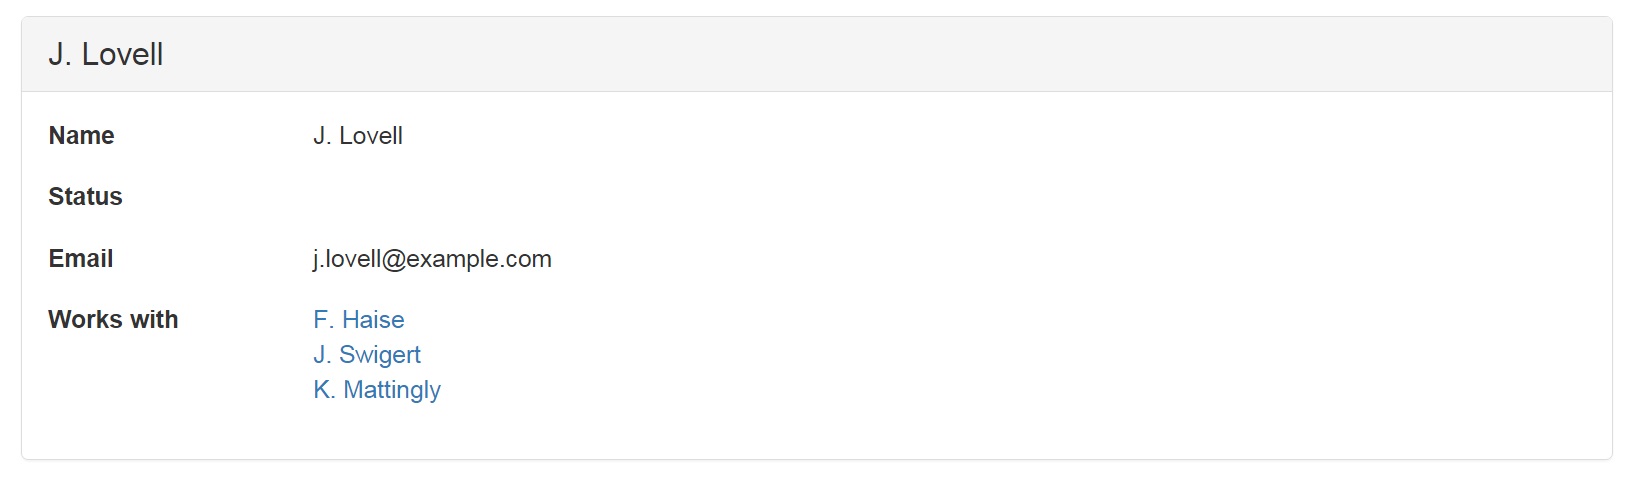
The following figure is an example of a user interface, which shows the name, status, e-mail and co-workers of a person called "J. Lovell".
The specification of this user interface is given in the following interface definition:
INTERFACE Person : I[Person]
BOX
  [ "Name"       : personName
  , "Status"     : personStatus
  , "Email"      : personEmail
  , "Works with" : workswith
  ]
To understand this fragment, take notice of:
The name of this interface is
Person. This name immediately follows the keywordINTERFACE.The term following the colon,
I[Person], is the interface term of this interface.The interface can be applied to any atom from the domain of the interface term. So this particular interface is applicable to any atom of type
Person. In the screenshot, it applies to"J. Lovell".The labels "Name", "Status", "Email", and "Works with" correspond to field names in the user interface.
Each term at the right of a field name specifies which data is presented in the field. For this reason it is called the field term for that field. Field name and field term are separated by a colon.
Of all pairs
<"J. Lovell", x>from the field term, the field displays the right atomx. A field term always works on one specific atom on the left, which is"J. Lovell"in this example.Field terms are subject to type checking. The following relations provide an example for getting a type-correct interface:
RELATION personName :: Person * PersonName [UNI]
RELATION personStatus :: Person * PersonStatus [UNI]
RELATION personEmail :: Person * Email [UNI,TOT]
RELATION workswith :: Person * Person
The source concepts of a field term must match the target concept of the interface term.
Looking at the screenshot, we can tell that
"J. Lovell"has one personName (which is"J. Lovell"), it has no personStatus, one personEmail and three persons to work with inRELATION workswith.
Nesting
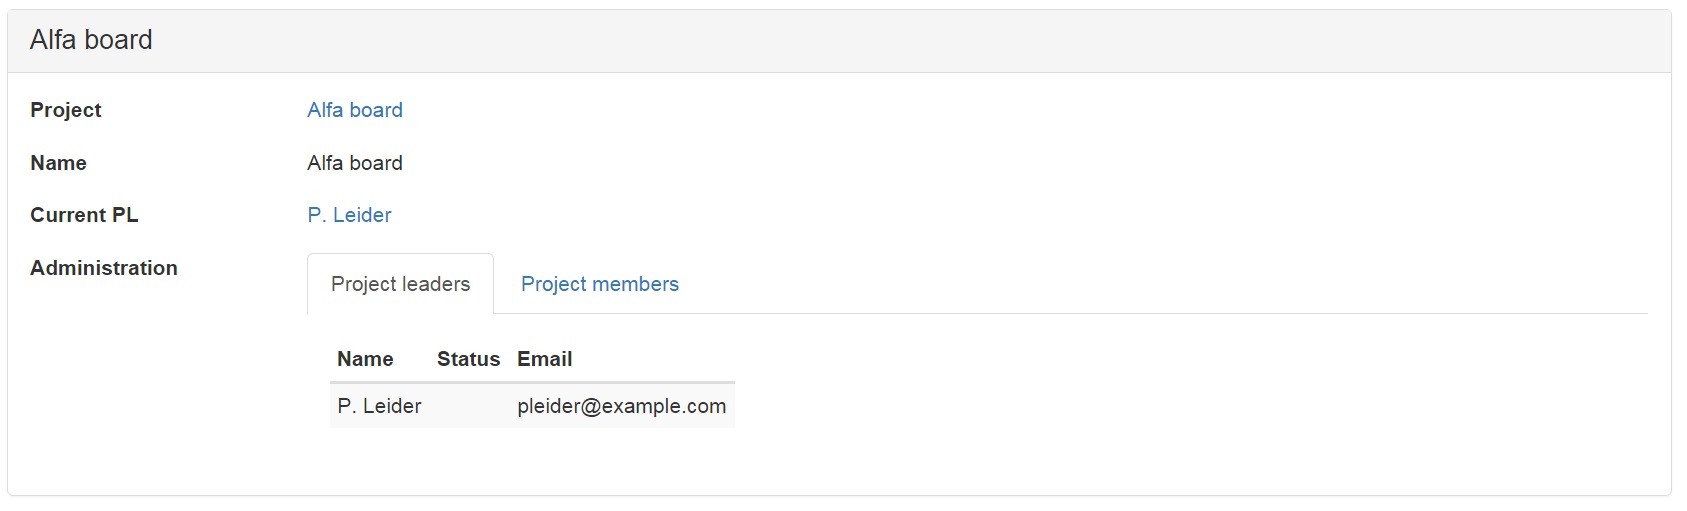
You can create structure in an interface by nesting. Here is an example:

The specification of this interface is given in the following code fragment.
INTERFACE "Project"  : I[Project] BOX
  [ "Project"     : I[Project]
  , "Name"        : projectName
  , "Current PL"  : pl
  , "Administration" : I[Project] BOX
     [ "Project leaders" : project~;assignee/\pl BOX
        [ "Name"      : personName
        , "Status"    : personStatus
        , "Email"     : personEmail
        ]
     , "Project members" : project~;assignee/\member BOX
        [ "Name"      : personName
        , "Status"    : personStatus
        , "Email"     : personEmail
        ]
     ]
  ]
Notice the following features:\
1. The structure of an interface is hierarchical. It consists of boxes within a box. This is because a field term may be followed by a BOX with a list of subinterfaces. Without it, it is just a field term. 2. When a field term is followed by a BOX, every atom in the codomain of the field term is displayed in a box of its own on the screen. That box behaves like an interface with the field term serving as interface term of that subinterface. 3. By this mechanism, the hierarchical structure of the entire interface translates directly to the hierarchical structure of the web-page in which it is displayed. 4. The source concept of a field term must match with the target concept of the field term outside the box. 5. The target concept of a field term that has a box, must match with the source concepts of each field inside that box.
Formatting
Especially in more complicated interfaces, you will find it nice to adapt the layout of the fields in the user interface. For this purpose, you can refine the word BOX with <FORM>, <TABLE>, or <TABS>, as in the following code fragment. Note that these annotation have no meaning other than to change what the user interface looks like.
INTERFACE "Project"  : V[SESSION*Project]
BOX<TABLE>
  [ "Project"     : I[Project]
  , "Name"        : projectName
  , "Current PL"  : pl
  , "Administration" : I[Project]
    BOX <TABS>
     [ "Project leaders" : project~;assignee/\pl
       BOX <TABLE>
        [ "Name"      : personName
        , "Status"    : personStatus
        , "Email"     : personEmail
        ]
     , "Project members" : project~;assignee/\member
       BOX <TABLE>
        [ "Name"      : personName
        , "Status"    : personStatus
        , "Email"     : personEmail
        ]
     ]
  ]
Notice the effect that these changes have on the user interface.
Notice the following features:\
1. The keyword BOX <TABS> turns the box into a layout with tabs.\
2. The keyword BOX <TABLE> turns the layout 90 degrees into columns.\
3. The keyword BOX <FORM> is default for any box. It does not change the effect of BOX.
Layout and Widgets
So far you have seen how the BOX keyword controls the layout of an interface. Under the hood, Ampersand uses templates to turn an interface definition into a screen. There are three kinds:
- Box templates decide how a box and its sub-boxes are arranged. You have already met
BOX <FORM>(the default, one field per row),BOX <TABLE>(a tabular layout) andBOX <TABS>(tabbed sub-boxes). A few more are available:BOX <RAW>shows the same data without styling or extra functionality, handy when you supply your own layout.BOX <PROPBUTTON>renders a button that sets, clears or flips one or more property-relations when clicked.BOX <OBJECTDROPDOWN>andBOX <VALUEDROPDOWN>let the user pick from a dropdown to populate a relation (useOBJECTDROPDOWNfor objects,VALUEDROPDOWNfor values that have aREPRESENTtype).
- Atomic templates render the leaf fields (the box items that show a single value). Ampersand picks the right widget automatically from the concept's type: a text field for alphanumeric values, a number field, a date picker for dates, a checkbox for booleans, and so on.
- View templates are used when a box item refers to a user-defined
VIEW(for examplepl <PersonEmail>), so you can control exactly how an atom is shown.
For prototyping you rarely need more than FORM, TABLE and TABS. When you do, the interface templates section of the syntax reference lists every template and its attributes.
Assignment
Compile and run the script Project Administration Example. Start by reproducing everything that is shown above. It is quite likely that you will be trying out your own ideas before you get to the end... Have fun!
What have you learned?
After finishing your assignment, you have learned:
to explain how an interface definition is displayed on the screen of a user.
to predict which data items an interface applies to, if you know which pairs are in an interface term.
to predict which data items are displayed, if you know which pairs are in a field term.
to explain which atoms are used in a sub-interface.
to understand what the keywords
TABS,COLS, andROWSdo to your display.More than one interface may apply to the same atom. That gives you a choice on runtime to which interface you want to navigate. If no interface applies, that atom is not navigable.