How to deploy RAP on Docker
RAP4 is a tool that is being used by the Open University of the Netherlands (OUNL) in the course Rule Based Design. It lets students analyse Ampersand models, generate functional designs and make prototypes of information systems. It is the primary tool for students in relation to Ampersand. Click here to try it out...
You can deploy RAP4 yourself by following the following instructions.
Assumptions
- RAP4 runs on linux. If you are on Windows, you need to install WSL2 in order to take full advantage of the functionality of RAP4. Here are the installation instructions for WSL2. There is also a nice youtube item on how to configure WSL2 and a quick overview of it.
- For the rest of this Readme, we assume you have linux running. This recipe has worked on Ubuntu 20.04.6 LTS (GNU/Linux 5.4.0-149-generic x86_64).
Prerequisites
Installation
Follow these steps to get up and running:
On a command line, paste the following commands:
git clone https://github.com/AmpersandTarski/RAP.git RAP
cd RAP
git checkout main
This will clone the software and make it available on your machine.
Copy the file
.example.envto.env. It contains environment variables that are required by RAP. :cp .example.env .envEdit the values in the .env file as follows (or leave them if you're in a rush)
 * MYSQL_ROOT_PASSWORD=<invent a secure password for the DB root>
 * MYSQL_AMPERSAND_PASSWORD=<invent a secure password for the user 'ampersand'>
 * SERVER_HOST_NAME=<the full domain name of the host, e.g. 'localhost' or 'rap.cs.ou.nl'>
 * DISABLE_DB_INSTALL=<set to 'false' if you need to install the RAP4 database. Set to 'true' in production>
Build an image and create a proxy and a rap_db network.
docker compose build
docker network create proxy
docker network create rap_db
Spin up RAP4.
If on your laptop, do it locally:
docker compose up -dOr, if you are working from a server other than localhost:
docker compose -f docker-compose.yml -f docker-compose.prod.yml up -dIn your browser, navigate to your hostname, e.g.
localhost. You should now see this: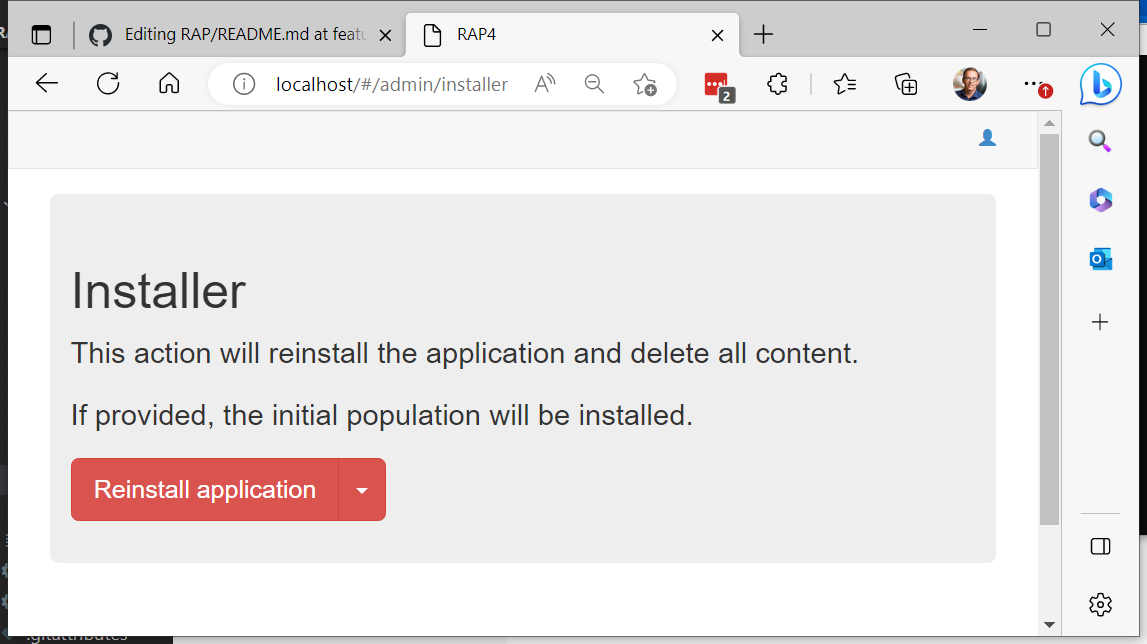
Now click the red "Reinstall application" button. This creates a fresh RAP4 database, so it may take a while.
In your browser, click on Home or navigate to your hostname, e.g. http://localhost. Now you will see the RAP-application

You're not done yet! Now enable RAP to generate prototypes for your users
docker exec -it rap4 bash
sudo chmod 666 /var/run/docker.sock
exit
This step may not be possible on Windows. If that's the case then skip it.
For security reasons, set
DISABLE_DB_INSTALLtotruein your.envfile and repeat step 4 to effectuate this change.For security reasons, stop the database client:
docker stop phpmyadmin
Testing
- Verify that you can register as a user
- Verify that you can login as that same user.
- Verify that you can create a new script (push the + in the north-east corner of your - RAP4-screen)
- Verify that the compiler works by compiling an example script.
- Verify that the compiler generates error message when you make a deliberate mistake in your example script.
- Check that once the script is correct, the buttons Func Spec, Atlas, and Prototype are active.
- Try to generate a conceptual analysis. At the bottom of the screen you should find the result, which is a Word-file. Open it in Word and check that it contains text.
- Try the Atlas. Browse through the elements of your script.
- Generate a Prototype. Upon success you will see a link "Open Prototype".
If you get a permission error for
/var/run/docker.socksomething went wrong with step 8. Turn to "troubleshooting" for possible solutions. - Open the prototype. The URL
<yourname>.<hostname>(e.g.student123.rap.cs.ou.nl) should appear in a new tab in your browser. - Install the database by pushing the red button.
- Verify that your prototype works.
- Verify that
enroll.<hostname>(e.g. enroll.rap.cs.ou.nl) works
Maintaining and redeploying RAP4
When changes have been made to the master branch of the RAP-repository, you may want to redeploy the new version. Go into your server with a CLI and rebuild the application:
    cd RAP
    git pull
    docker compose build
    docker compose -f docker-compose.yml -f docker-compose.prod.yml up -d
(or, if you work from localhost, simplify the last line to docker compose up -d)
For inspecting the database, bring up phpmyadmin:
docker compose up -d phpmyadmin
Then in your browser you can access the database with URL phpmyadmin.<hostname> (e.g. phpmyadmin.rap.cs.ou.nl). Of course you will need the database password for root or for ampersand that you invented in step 4 of the installation.
Don't forget to shut phpmyadmin down afterwards.
In the unlikely and undesirable event that you want to reinstall the RAP4 database, don't forget to set the environment variable that disables the reset to false. Switch it back after you're done.
Troubleshooting
Here are a few things that could go wrong when you install RAP4. The numbers correspond to the installation steps above.
If cloning RAP4 fails, you may need an account at github to create a token, which is necessary for your server to access the package. If you do not have one, you can register here. It's free. To create a token to allow access to the package, follow these steps: 1) Head over to the settings of your github account. 2) Press the button to generate a new token. 3) Fill in a name for your token, and make sure to check the checkbox
read:packages. 4) Press theGenerate tokenat the bottom of the page. 5) Copy the token into your clipboard (Beware, you only can do this as long as the page shows. You have to create a new token if for some reason you loose the token) 6) login to docker using the command```
docker login docker.pkg.github.com
```
Your username will be asked, and you have to supply the generated token as a password.You will only have to do this once for your computer. After that, GitHub knows this machine.
After you have cloned RAP4, stay in you working directory.
The environment variables in .env are used in
docker-compose.yml. For setting the environment variables, use any text editor (VS-code, vim, or whatever). For security reasons, use strong passwords and keep your .env file secret. If you set the variableDISABLE_DB_INSTALLtotrue, you won't be able to generate a new RAP4 database. During production, you want to disable that. If you are familiar with docker compose, have a look at the environment variables. Check thatAMPERSAND_DEBUG_MODE=trueto get debug information if you have trouble refreshing the database. In the file .env you need to specify database passwords for the root account so you can always access the database for whatever purpose. You also specify the ampersand account to allow access to the database for yourself, for the rap4 service, for the demo application (enroll) and for the prototypes a user runs. These credentials are not stored in the RAP4 GitHub-repo (for obvious security concerns), so you must invent them and keep them secret.NOTE: The security risk for passwords, which was a known issue, has become smaller but it has not vanished. Anyone with access to the build-machine can access .env and see the passwords. From the outside, the Open University (OUNL) server is accessible only through a VPN-link and the machine itself is protected with a username/password. This is enough security for now. However, when an outsider gains access, bot passwords are readable in the .env file.
TODO: implement secrets to improve security.
When building an image, you might discover that Docker is not installed. So follow these Instructions to install Docker. Building RAP4 may take a while, but the build-log should be scrolling over your screen. If building fails, raise an issue on GitHub. Please include the build log. The network
proxyis necessary for Traefik to connect to the internet. Traefik is an edge router, aka proxy, that takes care of HTTPS security.Spinning up the RAP4 services should work without problems. If this fails, something is wrong with Docker or with your installation of Docker. Check with
docker psthat your services are running. This is what it should look like:CONTAINER ID IMAGE COMMAND CREATED STATUS PORTS NAMES
df9cb753d968 ampersandtarski/enroll:latest "docker-php-entrypoi…" 4 seconds ago Up 2 seconds 80/tcp enroll
b785fce3bbe3 ampersandtarski/ampersand-rap:2020 "docker-php-entrypoi…" 4 seconds ago Up 2 seconds 80/tcp rap4
b48f554ef066 phpmyadmin/phpmyadmin:latest "/docker-entrypoint.…" 4 seconds ago Up 2 seconds 80/tcp phpmyadmin
f734bb29473f mariadb:10.4 "docker-entrypoint.s…" 6 seconds ago Up 4 seconds 3306/tcp rap4-db
4e442d15266a traefik:v2.2 "/entrypoint.sh trae…" 6 seconds ago Up 4 seconds 0.0.0.0:80->80/tcp, 0.0.0.0:443->443/tcp traefikStep 5 is "the proof of the pudding". If it goes wrong, that is usually because of errors in the configuration. Check the previous steps carefully and verify you have made no mistakes. To diagnose, set
AMPERSAND_DEBUG_MODE=truetrue in your `docker-compose.yml file (in the services rap4 and enroll) and redo step 4. For diagnosing the mistakes, inspect the log files:docker compose logsIf you see this error message, the cause is a missing RAP database.
 You should have obtained the "Installer" screen with the red button "Reinstall application".
Things to try:
You should have obtained the "Installer" screen with the red button "Reinstall application".
Things to try:- If the URL in your browser ends with "/#/", add "admin/installer" to it. That should bring you to the "Installer" screen.
- If the Installer screen does not install a database, inspect the environment variable
AMPERSAND_DEBUG_MODEin the filedocker-compose.yml. It should betrueto install the database.
If your browser fails to produce a working application:
- check the database credentials. RAP4 does not report a failure to connect to the database if the environment variable
AMPERSAND_DEBUG_MODEisfalse. - verify that you can access the database by running phpmyadmin (URL:
phpmyadmin.<hostname>, e.g. phpmyadmin.rap.cs.ou.nl) - check that you can access the database as root (using the root password you provided in step 4)
- check that user 'ampersand'@'%' has all rights except administrative rights.
- verify that the database 'rap4' exists. if it doesn't, navigate to
<hostname>/admin/installerand press the red button to install the database. - if installation doesn't work, verify that the environment variable
AMPERSAND_PRODUCTION_MODEin the RAP4-container is set tofalse. If it is not, step 4 has not been carried out properly. While you are in the rap4-container, you can setAMPERSAND_PRODUCTION_MODEtofalseby hand and reinstall the database. Don't forget to set it back totrueonce the database is up and running.
This step should not give any trouble to shoot...
The prototypes of a RAP4 user will run in a dedicated container for that user only. For this purpose, RAP4 needs access to the docker repository on its host. However, sometimes this access is protected. In that case you must allow the rap4 service to read and write in the docker repository. You can verify this by going into the rap4 service and checking whether it has access:
   sjo@laptop:~/RAP % docker compose exec rap4 bash
   root@37b03f1540bd:/var/www# ls -lah /var/run/docker.sock
   srw-r--r-- 1 root root 0 Oct 22 20:40 /var/run/docker.sock
   root@37b03f1540bd:/var/www# chmod 666 /var/run/docker.sock
   root@37b03f1540bd:/var/www# ls -lah /var/run/docker.sock
   srw-rw-rw- 1 root root 0 Oct 22 20:40 /var/run/docker.sock
   root@37b03f1540bd:/var/www# exit
   exit
   sjo@laptop:~/RAP %
By the way, to change the protection is not an elegant way and may be a security risk. Normally this file should have code 660, which means that only the owner and members of the group docker have read and write access. TODO: find out a better way to grant RAP4 access to the docker-socket.
Step 8 should work without problems. When you set
DISABLE_DB_INSTALLtotruein your .env file, you have to make this known to the containers in RAP4. That is why you must repeat step 5. By way of experiment, try to delete the database as a user. You shouldn't be able to.Step 9 should work without problems. Since phpmyadmin is a stateless service, stopping or killing the phpmyadmin-service has the same effect: it disables database access by users. If, after some time, you need to enter the database (e.g. for checking things) you can start phpmyadmin again.
Note: To gain access to phpmyadmin there are 2 user accounts: root and ampersand. Passwords for these accounts can be found in the .env file (see step 4).