Deployment
This guide will lay down the steps required to deploy RAP to Docker and to Kubernetes.
General Requirements
The following programs / APIs / SDKs should be installed in your system.
- VS Code (for development and the built-in terminal)
All commands in this guide are run in VS Code's built-in terminal. On Windows this is Powershell, on Linux/macOS the default is Bash, but others are supported.
- Docker Desktop (for building and running local containers)
The first time installing Docker Desktop might require some additional set up.
Setting up Docker Desktop on Windows
To run docker desktop on windows wsl needs to be enabled. To do this follow the instructions provided here.
Building Images
RAP makes use of two images: ampersand-rap and rap4-student-prototype. These images are built from the RAP4 and the RAP4USER folders respectively.
The process for building images will be explained here.
Images are built using Docker, so start Docker Desktop.
Open a terminal and navigate to the desired folder (RAP4 or RAP4USER).
# For the ampersand-rap image
cd ./RAP4

# For the rap4-student-prototype image
cd ./RAP4USER
In this folder execute the following command:
# To build ampersand-rap
docker build -t ampersandtarski/ampersand-rap:2025-03-03 .

# To build rap4-student-prototype
docker build -t ampersandtarski/rap4-student-prototype:2025-03-03 .
This will build the image and assign the 2025-03-03 tag to it. An image with this tag will be stored by Docker for later use.
Docker
Deploying to docker
On a command line, paste the following commands:
git clone https://github.com/AmpersandTarski/RAP.git RAP
cd RAP
git checkout main
This will clone the software and make it available on your machine.
Copy the file
.example.envto.env. It contains environment variables that are required by RAP. :cp .example.env .envEdit the values in the .env file as follows (or leave them if you're in a rush)
 * MYSQL_ROOT_PASSWORD=<invent a secure password for the DB root>
 * MYSQL_AMPERSAND_PASSWORD=<invent a secure password for the user 'ampersand'>
 * SERVER_HOST_NAME=<the full domain name of the host, e.g. 'localhost' or 'rap.cs.ou.nl'>
 * DISABLE_DB_INSTALL=<set to 'false' if you need to install the RAP4 database. Set to 'true' in production>
Build an image and create a proxy and a rap_db network.
docker compose build
docker network create proxy
docker network create rap_db
Spin up RAP4.
If on your laptop, do it locally:
docker compose up -dOr, if you are working from a server other than localhost:
docker compose -f docker-compose.yml -f docker-compose.prod.yml up -dIn your browser, navigate to your hostname, e.g.
localhost. You should now see this: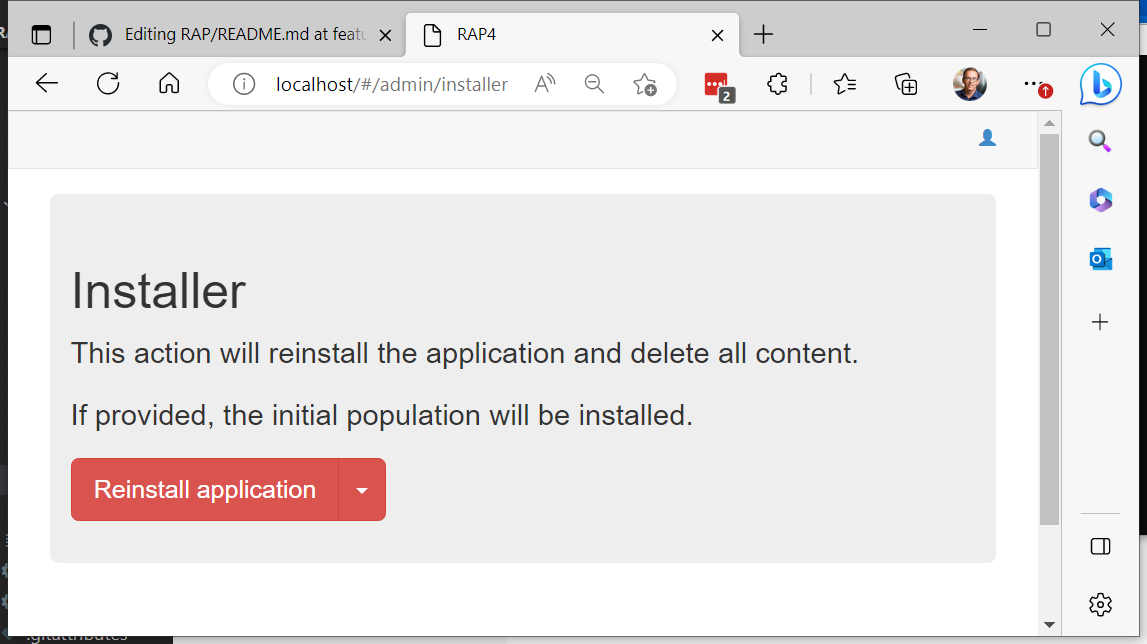
Now click the red "Reinstall application" button. This creates a fresh RAP4 database, so it may take a while.
In your browser, click on Home or navigate to your hostname, e.g. http://localhost. Now you will see the RAP-application

You're not done yet! Now enable RAP to generate prototypes for your users
docker exec -it rap4 bash
sudo chmod 666 /var/run/docker.sock
exit
This step may not be possible on Windows. If that's the case then try it without "sudo" (or skip it).
For security reasons, set
DISABLE_DB_INSTALLtotruein your.envfile and repeat step 4 to effectuate this change.For security reasons, stop the database client:
docker stop phpmyadmin
Testing the docker deployment
- Verify that you can register as a user
- Verify that you can login as that same user.
- Verify that you can create a new script (push the + in the north-east corner of your - RAP4-screen)
- Verify that the compiler works by compiling an example script.
- Verify that the compiler generates error message when you make a deliberate mistake in your example script.
- Check that once the script is correct, the buttons Func Spec, Atlas, and Prototype are active.
- Try to generate a conceptual analysis. At the bottom of the screen you should find the result, which is a Word-file. Open it in Word and check that it contains text.
- Try the Atlas. Browse through the elements of your script.
- Generate a Prototype. Upon success you will see a link "Open Prototype".
If you get a permission error for
/var/run/docker.socksomething went wrong with step 8. Turn to "troubleshooting" for possible solutions. - Open the prototype. The URL
<yourname>.<hostname>(e.g.student123.rap.cs.ou.nl) should appear in a new tab in your browser. If you get a "404 page not found", look in the student prototype container log in Docker. If it starts with "$'\r': command not found", then convert the line-endings of RAP4USER/run-student-prototype.sh to Unix style with a tool (f.e. NotePad++ on Windows) and rebuild the image (see above) - Install the database by pushing the red button.
- Verify that your prototype works.
- Verify that
enroll.<hostname>(e.g. enroll.rap.cs.ou.nl) works
Local Kubernetes
Before deploying to a local Kubernetes cluster, Kubernetes on Docker Desktop needs to be enabled.
Setting up Kubernetes on Docker Desktop
- From the Docker Dashboard, select the Settings.
- Select Kubernetes from the left sidebar.
- Next to Enable Kubernetes, select the checkbox.
- Select Apply & Restart to save the settings and then select Install to confirm. This instantiates images required to run the Kubernetes server as containers, and installs the /usr/local/bin/kubectl command on your machine.
Connecting to the Kubernetes Cluster
Once you have installed Docker Desktop and enabled Kubernetes, you can use kubectl commands. To check if it works run the following command.
kubectl version -o=yaml
Which should yield a result like below.
clientVersion:
  buildDate: "2023-03-15T13:40:17Z"
  compiler: gc
  gitCommit: 9e644106593f3f4aa98f8a84b23db5fa378900bd
  gitTreeState: clean
  gitVersion: v1.26.3
  goVersion: go1.19.7
  major: "1"
  minor: "26"
  platform: windows/amd64
kustomizeVersion: v4.5.7
serverVersion:
  buildDate: "2023-05-17T14:13:28Z"
  compiler: gc
  gitCommit: 7f6f68fdabc4df88cfea2dcf9a19b2b830f1e647
  gitTreeState: clean
  gitVersion: v1.27.2
  goVersion: go1.20.4
  major: "1"
  minor: "27"
  platform: linux/amd64
Deploying to a local cluster
For local deployment an ampersand-rap and a rap4-student-prototype image need to be built following the instructions above.
Navigate to the deployment/kubernetes folder.
cd ./deployment/kubernetes/The rap deployment consists of two parts. The first will deploy ingress and cert manager. The second will deploy the application and related things. Deployment is done by applying the proper kustomization.yaml files. By pointing kubectl to a directory containing a kustomization file Kubernetes will aggregate and patch the files or directories that are set as resources in said file.
To deploy ingress and cert manager run the following command:
kubectl apply -k ./general/You must now wait for the ingress and cert manager to be up and running, as this will guarantee that all resources required in the next step are available for use. To check and monitor the progress run:
kubectl get pods -A --field-selector metadata.namespace!=kube-system -wThe output will resemble the following:
NAMESPACE       NAME                                        READY   STATUS      RESTARTS   AGE
cert-manager    cert-manager-cainjector-744bb89575-xchxd    1/1     Running     0          52s
cert-manager    cert-manager-startupapicheck-vv7n8          0/1     Completed   0          52s
cert-manager    cert-manager-webhook-759d6dcbf7-zbwwh       1/1     Running     0          52s
ingress-nginx   ingress-nginx-admission-create-gxhft        0/1     Completed   0          52s
ingress-nginx   ingress-nginx-admission-patch-b4nks         0/1     Completed   1          52s
ingress-nginx   ingress-nginx-controller-6f79748cff-npp8n   1/1     Running     0          52s
ingress-nginx   ingress-nginx-controller-6f79748cff-wr8qj   1/1     Running     0          52s
Use
ctrl + cto stop watching.Once all pods are running or completed, create an
.env.secretsfile in the.\base\rap\database\rapand.\base\rap\database\mariadbfolders. Use the existingexample.env.secretsfound in each respective folder as a base for the file to be created in that folder. Replace the values for the passwords with a secure password. Replace the value for the server host name with the full domain name of the host, e.g. 'localhost' or 'rap.cs.ou.nl'. These files are used to generate the required secret files on the cluster.Now the application can be deployed. In this example the Ordina staging deployment will be used.
kubectl apply -k ./overlays/local/dev/Make sure that all the pods are running.
kubectl get pod -n rap-dev -wThe result should resemble:
NAME                                               READY   STATUS             RESTARTS      AGE
enroll-dev-6cb55c694-5cxdl                     1/1     Running            0             66s
phpmyadmin-dev-6b559f4965-6vhf8                1/1     Running            0             66s
rap-db-dev-0                                   1/1     Running            0             65s
rap-dev-67cbdf4d5-w45m8                        1/1     Running            0             66s
student-prototype-cleanup-dev-28236180-tmbqh   0/1     Completed          0             26s
student-prototype-dev-cdd59fbb8-s9vmk          0/1     CrashLoopBackOff   3 (18s ago)   66s
Use
ctrl + cto stop watching.
Testing the local deployment
To check whether the application is deployed porperly, port-forward the service and open it in a browser. Once everything is ready run the following command:
kubectl port-forward svc/rap-dev -n rap-dev 8001:80Running this command will connect the service to port 8001. The application can be tested by opening a browser and navigating to localhost:8001.
ctrl + ccan be used to cancle the port-forward.In your browser, navigate to your hostname, e.g.
localhost. You should now see this:Now click the red "Reinstall application" button. This creates a fresh RAP4 database, so it may take a while.
In your browser, click on Home or navigate to your hostname, e.g. http://localhost. Now you will see the RAP-application
Verify the following.
- Verify that you can register as a user
- Verify that you can login as that same user.
- Verify that you can create a new script (push the + in the north-east corner of your - RAP4-screen)
- Verify that the compiler works by compiling an example script.
- Verify that the compiler generates error message when you make a deliberate mistake in your example script.
- Check that once the script is correct, the buttons Func Spec, Atlas, and Prototype are active.
- Try to generate a conceptual analysis. At the bottom of the screen you should find the result, which is a Word-file. Open it in Word and check that it contains text.
- Try the Atlas. Browse through the elements of your script.
- Generate a Prototype. Upon success you will see a link "Open Prototype".
- Open the prototype. The URL
<yourname>.<hostname>(e.g.student123.rap.cs.ou.nl) should appear in a new tab in your browser. When testing locally use the port-forward technique described above to connect to the newly created service. In such a case replacesvc/rap-devwithsvc/<yourname>. - Install the database by pushing the red button.
- Verify that your prototype works.
- Verify that
enroll.<hostname>(e.g. enroll.rap.cs.ou.nl) works. When testing locally use the port-forward technique described above to connect to the newly created service. In such a case replacesvc/rap-devwithsvc/enroll-dev.
Azure Kubernetes Service
Requirements
Azure CLI is required to be able to interact with Azure through the command line.
- Azure CLI (AKS only)
Permissions
In order to manage the AKS cluster Contributor rights to the cluster are required.
Connecting to Azure
Binding the Kubernetes CLI to Azure can be done with the following command. Note that you have to be logged in to Azure for this to work.
az aks get-credentials -g <resource-group-name> -n <aks-cluster-name> --overwrite-existing
bijvoorbeeld
az aks get-credentials -g kubernetes-prd -n ampersand-rap-aks-prd --overwrite-existing
Dit commando zorgt ervoor dat de kubectl commando's worden uitgevoerd op de verbonden cluster. Je kunt nu ook k9s gebruiken om dit cluster aan alle kanten te inspecteren.
After executing the command, any kubectl commands will be run on the connected cluster. To connect to a different cluster, first retreive a list of all available clusters.

```pwsh
kubectl config get-contexts
Then the following command can be used to switch to the desired cluster.
kubectl config use-context <<NAME>>
Deploying to AKS
The first step is to log in to Azure using the Azure CLI, followed by connecting to the cluster.
az login
az aks get-credentials -g <<resource-group>> -n <<AKS-name>> --overwrite-existing
Next navigate to the deployment/kubernetes folder.
cd ./deployment/kubernetes/The rap deployment consists of two parts. The first will deploy ingress and cert manager. The second will deploy the application and related things. Deployment is done by applying the proper kustomization.yaml files. By pointing kubectl to a directory containing a kustomization file Kubernetes will aggregate and patch the files or directories that are set as resources in said file.
Find the
ingress-nginx-controller.yamlfile in the./general/ingressfolder. Find the LoadBalancer Service and fill in thespec.loadBalancerIPusing the value of the static IP resource.To deploy ingress and cert manager run the following command:
kubectl apply -k ./general/After it is done applying the files it is imperative to wait for the ingress and cert manager to be up and running as this will guarantee that all resources required in the next step are available for use. To check and monitor the progress run:
kubectl get pods -A --field-selector metadata.namespace!=kube-system -wThe output will resemble the following:
NAMESPACE       NAME                                        READY   STATUS      RESTARTS   AGE
cert-manager    cert-manager-cainjector-744bb89575-xchxd    1/1     Running     0          52s
cert-manager    cert-manager-startupapicheck-vv7n8          0/1     Completed   0          52s
cert-manager    cert-manager-webhook-759d6dcbf7-zbwwh       1/1     Running     0          52s
ingress-nginx   ingress-nginx-admission-create-gxhft        0/1     Completed   0          52s
ingress-nginx   ingress-nginx-admission-patch-b4nks         0/1     Completed   1          52s
ingress-nginx   ingress-nginx-controller-6f79748cff-npp8n   1/1     Running     0          52s
ingress-nginx   ingress-nginx-controller-6f79748cff-wr8qj   1/1     Running     0          52s
Use
ctrl + cto stop watching.Once all pods are running or completed, create an
.env.secretsfile in the.\base\rap\database\rapand.\base\rap\database\mariadbfolders. Use the existingexample.env.secretsfound in each respective folder as a base for the file to be created in that folder. Replace the values for the passwords with a secure password. Replace the value for the server host name with the full domain name of the host, e.g. 'localhost' or 'rap.cs.ou.nl'. These files are used to generate the required secret files on the cluster.Now the application can be deployed. In this example the Ordina staging deployment will be used.
kubectl apply -k ./overlays/ordina/staging/Make sure that all the pods are running.
kubectl get pod -n rap-staging -wThe result should resemble:
NAME                                               READY   STATUS             RESTARTS      AGE
enroll-staging-6cb55c694-5cxdl                     1/1     Running            0             66s
phpmyadmin-staging-6b559f4965-6vhf8                1/1     Running            0             66s
rap-db-staging-0                                   1/1     Running            0             65s
rap-staging-67cbdf4d5-w45m8                        1/1     Running            0             66s
student-prototype-cleanup-staging-28236180-tmbqh   0/1     Completed          0             26s
student-prototype-staging-cdd59fbb8-s9vmk          0/1     CrashLoopBackOff   3 (18s ago)   66s
Use
ctrl + cto stop watching.
Testing the AKS deployment
To check whether the application is deployed porperly, port-forward the service and open it in a browser. Once everything is ready run the following command:
kubectl port-forward svc/rap-dev -n rap-dev 8001:80Running this command will connect the service to port 8001. The application can be tested by opening a browser and navigating to localhost:8001.
ctrl + ccan be used to cancle the port-forward.In your browser, navigate to your hostname, e.g.
localhost. You should now see this:Now click the red "Reinstall application" button. This creates a fresh RAP4 database, so it may take a while.
In your browser, click on Home or navigate to your hostname, e.g. http://localhost. Now you will see the RAP-application
Verify the following.
- Verify that you can register as a user
- Verify that you can login as that same user.
- Verify that you can create a new script (push the + in the north-east corner of your - RAP4-screen)
- Verify that the compiler works by compiling an example script.
- Verify that the compiler generates error message when you make a deliberate mistake in your example script.
- Check that once the script is correct, the buttons Func Spec, Atlas, and Prototype are active.
- Try to generate a conceptual analysis. At the bottom of the screen you should find the result, which is a Word-file. Open it in Word and check that it contains text.
- Try the Atlas. Browse through the elements of your script.
- Generate a Prototype. Upon success you will see a link "Open Prototype".
- Open the prototype. The URL
<yourname>.<hostname>(e.g.student123.rap.cs.ou.nl) should appear in a new tab in your browser. When testing locally use the port-forward technique described above to connect to the newly created service. In such a case replacesvc/rap-devwithsvc/<yourname>. - Install the database by pushing the red button.
- Verify that your prototype works.
- Verify that
enroll.<hostname>(e.g. enroll.rap.cs.ou.nl) works. When testing locally use the port-forward technique described above to connect to the newly created service. In such a case replacesvc/rap-devwithsvc/enroll-dev.
Monitoring
While Azure provides some basic monitoring tools (e.g. node memory usage), additional and more specific monitoring may be required (e.g. memory usage per pod). To achieve this monitoring deployments are available in the solution. The monitoring consists of three parts:
- cAdvisor: This is a deployment that scrapes useful metrics from running pods.
- Prometheus: An open source monitoring tool. It takes the metrics from cAdvisor and saves them to a time series database. It also allows for alerts to be set.
- Grafana: An open source visualisation tool. While Prometheus hase some basic visualisation, Grafana is used for more detailed information.
Troubleshooting
Sometimes, during installation, you might run into unexpected situations. It is impossible to mention all of them, but we mention those that are known to us:
Connection issues to the Kubernetes server
You get an error:
The connection to the server 127.0.0.1:62454 was refused - did you specify the right host or port?
or:
Unable to connect to the server: EOF
There might be something wrong with the kubernetes server. Have a look at the docker desktop settings, in the kubernetes tab. There might be a message telling that the kubernetes server failed to start. If so, there is a button to 'Reset Kubernetes Cluster'.
You will notice a green symbol at the bottom left of the Kubernetes settings page, indicating that the server is running.
In some cases docker desktop indicates that the service is running, but actually it is not, resulting in the above error.
Open a terminal, and give the following command:
kubectl config view
This will show the configuration of Kubernetes. In my case, it says that minikube is configured to run on the port. I played with minikube some time ago, and uninstalled it. Uninstall didn't remove all loose ends: Check the contents of $HOME/.kube/config.
I also found help at stackoverflow.
Good luck & Happy coding!
Maintenance of RAP
Maintenance of the RAP application has diverse tasks, such as:
- resetting the RAP-application, to resolve operational issues such as a slow response time or memory leaks,
- updating the RAP-application,
- updating the database, and
- updating the images. This section explains how to perform these tasks.
Getting started
To manage and maintain RAP, you need access to the Azure platform of the OU.
Once you can log in on portal.azure.com, you need access to the resource group ampersand-rap-aks-prd.
You need the following role assignments (roltoewijzingen) for executing maintenance tasks:
- Azure Kubernetes Service RBAC-clusterbeheer, for managing all resources in the cluster.
- Lezer, for reading all resources in the resource group.
Your maintenance work is done under the Azure subscription informatica-prd, which is managed by the OU.
Verify that you can see the namespaces rap-staging and rap-production in the Azure portal.
For the sequel, we assume that you are working on cluster ampersand-rap-aks-prd in namespace ampersand-rap-aks-prd and resource group kubernetes-prd.
Connecting to Azure
You can log in to Azure from your CLI.
az login
Now connect to the cluster to let your kubectl commands take effect on this cluster.
az aks get-credentials -g kubernetes-prd -n ampersand-rap-aks-prd --overwrite-existing
From this moment on, you can also use k9s to inspect this cluster.
Find out about the available clusters:
kubectl config get-contexts
Switch to another cluster:
kubectl config use-context <<NAME>>
Changing environment variables in production
You must change the environment variable DISABLE_DB_INSTALL for resetting RAP.
This occurs every now and then when users experience irreproducible problems such as gateway timeouts, extremely slow behaviour, and the like.
Environment variable DISABLE_DB_INSTALL resides in the configmap administration-configmap-production,
but there are also environment variables in the pod manifest or the configmap administration-configmap-production.
In K9s, you can list all pods with command :pods, select (but not click) the pod starting with rap-production, and edit it by pressing e.
Similarly, you can list all configmaps with command :configmaps, select (but not click) the configmap administration-configmap-production, and edit it by pressing e.
For editing in k9s you need to know the most basic vi commands.
After editing, you need to restart the pod to let the changes take effect. I do that by deleting the pod, which kubernetes will then recreate immediately.